Sample Chess Lesson I
White to move and to win!
Maybe you would like to stop and try to solve it , before reading any further! And if you encounter problems, don't despair - it only means the lecture will help you even more!
As you will quickly notice, this is a combination! As promised, the puzzles will be from different areas of the game, but I decided to start with a combination for several reasons. First of all, in my opinion, most people want 2 things out of chess: to become better and have fun. Well, combinations are fun to play, and will definitely make you a better player!
Let me ask you something: How many games have you lost because of a
combination? How many times did you analyze your game and found a combination you missed
during the game, that could have won immediately? If "a lot" is the answer to
these questions, I hope that this lecture will help you improve!
The absolutely first thing you have to do when looking at a new position, is counting the
pieces. I know many players who like to count the pieces, not those on
the board, but those off the board. Don't ever do that!
Your opponent may be hiding a piece in his hands, or one may have fallen off the board.
Thinking you are a knight up, when you're not, can seriously impair your
judgment...
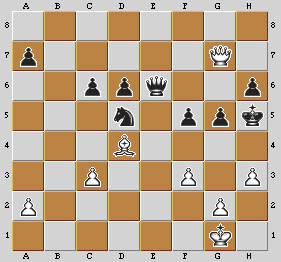
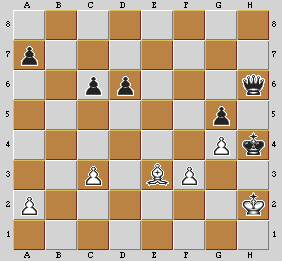
In our case, a quick piece count shows less than satisfactory results: with white, we are
a pawn down. So, what comes next?
The next step is extremely important: a quick assessment of the
position. Just glancing on the board we can arrive at several conclusions: our
queen is not very well placed compared with the black queen staying in the center, our
king lacks the protection of our queen, we have two weak pawns on a2 and c3, and black's
knight looks like it could become very strong! So things don't look that well...
But before we start to panic, let's take a minute to carefully analyze the
position. This thorough assessment should reveal a very interesting factor:
black's king is ALMOST checkmated! It has only one square to go to (h4) and our pawns can
get awfully close to the black king! So the big question is how do we actually checkmate?
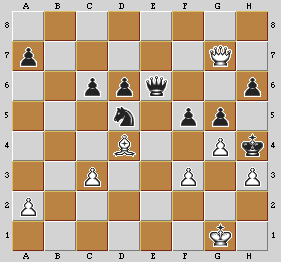
I think that two moves should immediately come to our attention. The first one would be
1.Bf2, controlling the h4 square and thus threatening g4+. Unfortunately, black has more
than one way to get out: either by pushing the g pawn himself, or bringing his knight to
f6.
The other obvious first move for white is 1. g4 check. Black's choices
are rather clear: he can move his king to h4, or first take our pawn and then advance his
king. Both look about the same, so let's start with 1...Kh4 at once.
Well, it seems like we merely helped the king. Now he's got two squares to go to,
including the threat of capturing our h3 pawn, which is what he would do after 2.Bf2+. So
we have to think about something better...
Well, it would certainly be nice if we could capture the h6 pawn with our queen, but the black queen is defending it. Any way to get rid of the black queen? Not really! Alright, so there must be something else...
Well, when a king has only a few squares left it is always good to think of ways to control those squares. Can we do this? Of course, what about 2. Kg2 or 2.Kh2? Both moves defend the h3 pawn and control the g3 square, thus threatening checkmate with Bf2. Can black stop the checkmate? Unfortunately yes... After 2.Kg2 he can play 2...Nf4+ and after 2. Kh2 he has 2...Qe2+... So, are we giving up?
NO! This is the very important moment where we have to realize that if we
could play Kh2 without the black queen checking us, we would win, so this should lead us
to another question: can we get the stupid queen off the e-file?
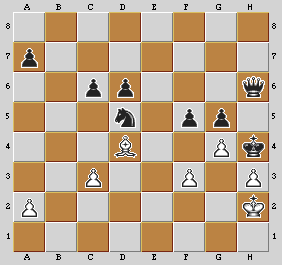
Well, if you pose the right question, the answer should be very simple! After all, we can
even sacrifice our queen as long as we checkmate on our next moves. So, 2.Qxh6
looks like a very reasonable choice. If black moves his king he would lose the queen, so
he has capture our queen with 2...Qxh6. Now we can finally play 3.Kh2,
threatening checkmate with Bf2:
Can you see the difference: the black queen can not harm us anymore! So, how can black stop checkmate? The knight could sacrifice itself on e3, but that would only postpone the inevitable; the king can't do anything, so his only move would be 3...fxg4.
Now, if you think we are completely winning, and we don't have to pay anymore attention, you're totally wrong! We must make an important choice: do we take the black pawn, and if yes, which pawn do we use? Taking with the 'f' pawn might look safer, but a careful glance will show us that black has the nice 4...Qf8 stopping the checkmate on 'f2' and keeping the queen... That's why we have to use our h pawn to capture: 4.hxg4
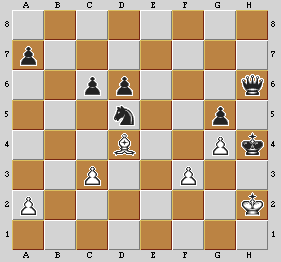
Now black is in big trouble. He can still play 4...Ne3 but after 5.Bxe3 there is absolutely no way (except maybe resigning) to stop us from checkmating with 6.Bf2.
Before we decide we are done, we have to check what happens if black plays 1...fxg4 instead of 1...Kh4 we just analyzed. Well, fortunately, it only changes the move order - everything else stays the same: 2.hxg4 Kh4 3.Qxh6 Qxh6 4.Kh2 Ne3 5.Bxe3 and we reach the exact same position:
So, did it seem so hard? Not if you ask the right questions! And that is exactly what
my lectures will teach you: when and what questions to ask, or to put it in other words,
the right thought process needed to solve these positions.
You may view a second sample lecture or rejoin
the tour!