Sample Chess Lesson III
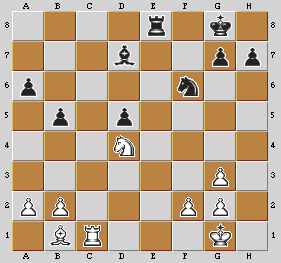
White to move
Let's start with the beginning: the position analysis. What are the important factors we should include in the analysis of this position? Let's begin with the fact that we are equal on material! Then let's go on to white, what can we say about our position?
Well, we have a relatively okay pawn structure apart from the doubled pawns on the 'g' file, we have a pretty strong knight on d4, our bishop looks better than its black counterpart, and the rook on c1 has better chances of getting inside the black fortress, than black's rook has of getting to e2 for instance. Moving on to black: he has an isolated pawn on d5, but which also happens to be a passed pawn, which we have to keep in mind, because in a pawn endgame for example it could have a decisive importance. I have already mentioned the relative weakness of the bishop and the rook...the knight on the other hand looks a little better: it is defending the d5 pawn and can go to the strong 'e4' position.
Having in view this concise analysis of the position, that you are absolutely required to do at the board as well, we can say that white seems a little superior. Good! Now we have arrived to the point where we have to choose a plan and the move related with it. A very important point, indeed.
Well, unfortunately something that is quite common for players of all strengths to do in such positions is to immediately think of ways to attack, to break into black's position. I mean it is pretty obvious we can not play at once 1.Rc7 because of 1...Re1 losing our bishop, but I agree, there are ways we could prepare Rc7...
So, how do you find the right move in this situation? There are two different thought paths we can take to reach the right decision! One is to have just like Karpov, the habit of checking every single move the possibility of restraining the activity of our opponent's pieces. If you study Karpov's games you will realize that he has gotten so far mostly because of the perfect understanding of almost every single position he finds himself in, and his ability to either place his pieces wonderfully, or make his opponent's pieces life hard by restraining their activity. So, as I said, if you can get yourself (I am still trying myself) to check every single move this idea of putting a fence around one or more of the opposing pieces, you would observe a clear improvement in your games, even if you don't reach Karpov's level...
Another very useful habit, that players of any strength should have, is to ask this question at every single move: "what does my opponent intend to do?" After all, isn't this why chess is considered such an intelligent game? Because we, chess players, are supposed to always know what our opponent's intentions are. Well, I think it happens to everyone (including myself) that we get caught in the excitement of our own plans and forget to ask this very important question, or ask it but respond only superficially. The reason I have brought up this question, is that in this position black's intention of placing his knight in a more active position is obvious: the rook and the bishop can't improve their situation a lot, but the knight can - by jumping to 'e4'. Knowing this, the right move should be easy: 1.f3
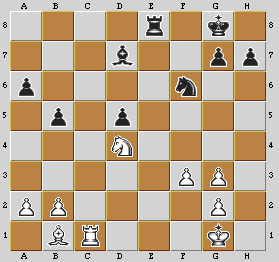
That's exactly what a prophylactic move should do: prevent something! Now, in this case the move f3 has one more important endgame advantage, which is why I said that you could use 2 thought paths. We all know that in endgames every piece counts, so we always have to think of ways to activate our king. This position is no exception, and a well exercised eye will immediately observe 'd4' as a great king position once the rooks are gone.
At the same token, we are interested in not letting the black rook come in if we move our knight, or otherwise put, we don't want to have our knight pinned to the e2 square. All these facts should point us either to the passive Kf1 or the better f3. Why is f3 better? Because in chess we're only allowed to move one move at the time, so we have to make each move as useful as possible! So, if a move like f3 does more than one thing, that's even better! And in our case, it certainly does. 1.f3 stops the knight from coming in, which actually transforms the position of the black knight from potentially active into plain passive, and at the same time prepares the perfect f2 square for the king. Before we move, however, we have to check one important disadvantage related with f3: the weakness of the square e3! Every pawn move is bound to make some sort of weakness and f3 is no exception. The question is if it really matters. Well, since the knight or the bishop can't get there, the only other potential customer is the rook. A quick look will show us though that after 1...Re3 2.Kf2 the black rook has to leave the same way it came, without posing the slightest danger. And since Kf2 is our intended next move, we won't have to worry about Re3 anymore. 1.f3 is a typical Karpov move!
The game continued for another 18 moves before white claimed the victory, but this is the point where the position became clearly better for white, and only 1.f3 could have achieved that. So, you see, prophylactic moves don't have to be passive!
TotalChess.com™ and Internet Chess Academy™ are trademarks of Caissa International Corporation. Copyright © 1996-2005 Gabriel Schwartzman. All rights reserved.